Wednesday, March 28, 2012

Scrap Balls


I saw scrap balls on someones blog months ago, sorry I can't remember where, and thought it would be fun to try.  The idea is to keep this next to your sewing machine or work area and keep feeding all the tiny pieces you can't save for something else into it instead of the garbage.  You know we crafters will save some pretty small bits to maybe make something else out of them.  You know you do.
Since I like to make stuff (pretty much any stuff), I always have remnants of all types.  I only begrudgingly throw out the tiniest of pieces.
The original pattern was the one on the left.  After I drew the pattern from the directions they gave, I knew it would be far too large a ball for my liking.  I redrafted it in the smaller size and sewed a scrap ball for myself.  The resulting ball took quite a long time to fill.  I left it sitting by the machine and used it when sewing.  It was very easy to get used to putting the scraps into it and fun to watch it slowly fill out.
When it felt stuffed so full that I thought I really couldn't get much more in it and still be able to sew it shut, I did just that.
It's pretty heavy for it's size, like a good orange.  It would be a good baby toy or a dryer ball.
I went along without a new one for a few months before I missed it.  There were a lot of tiny (bitty!) scraps in my basket next to the sewing machine. The crafter in me wanted to stuff a new ball and of course, here it comes, I couldn't leave well enough alone.  Enter the Acorn Scrap Ball.


You see the original lines of the pattern on the right, I made it pointier and cut off the top.  Then I made a circle for the top and gathered it in to fit.  A loop and some decorative stitching and I was ready to stuff.
Before I stuffed it I'd already drawn a new pattern for the next one.  Bigger top and shorter bottom.  Do you see a pattern to my craziness here?  No project can ever be left simple.
After stuffing, I found that it came out so much larger than the original and less acorny than I thought it would.  Maybe the next one will be the smaller top AND the smaller bottom.

I think these would be good to list, unstuffed, in my shop.  The round ones, that is, the acorn cap took a lot longer to sew on than I thought it would.
Crafters could make their own dryer balls and have less angst over scraps in the garbage.

Wednesday, March 21, 2012

Therapy Quilting

Last fall, I was feeling down and short on cash and decided to self medicate with crafting.  It almost always works for whatever ails me.  I had wanted to try wonky stars and threw the wonky log cabins in to mix it up.
I already had the bird fabric from IKEA and left over batting from Rachel's quilt.  The rest of these beauties came form Rachel's scrap bag.  She's made so many beautiful things for her Etsy shop, there was lots to choose from.
Front
Back

There was plenty of information on line to guide me through the star construction.  In September, I went to the Portland Modern Quilt Guild meeting and Ale had a lesson in quilting with perle cotton.  Very timely.  I've done a lot of quilting, but only with regular quilting thread.  This gave me another new thing
to try.


Most of the stars.  Apparently, I can't push the save button when I'm editing the photos.
All 5 stars.  There, it's in there now.


The log cabins, with little birdies peeking out.

The binding was all pieced from the same fabrics.  I accidently made too much and used the extra to make the back more interesting.  It's about 48 inches square.  If I was to do it over, I'd use a solid for the background.  The black and white had too much pattern to give the blocks enough contrast.
I have no use for this quilt, but enjoyed the process and it really did work to lift my spirits.  I spent a total of $3 on it for the perle cotton with my coupon.
My biggest lesson learned, was that I am not a wonky quilter.  This was way out of my comfort zone.  I like having things line up.
What have you done to work through the blues?


Wednesday, March 14, 2012

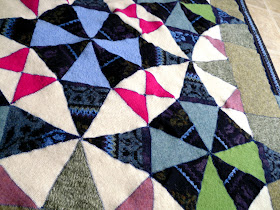
Kaleidoscope Blanket

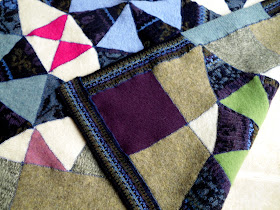
I finally finished the next blanket.  I love this pattern, how different it can look depending on the color arrangement.  This is the same pattern as the last blanket, just made to look like individual stars.

I was halfway done when the machine suddenly stopped.  It wouldn't move at all.  Good thing it wasn't in the needle down position.
I started with the darkest sweater.  It had lots of pattern and the fancy ribbing looked like it would be perfect for the outer border.  If you look closely you can see the button holes.
This sweater was hard to work with, it had 2 layers and it was hard to catch both edges when sewing it together.  I went back over a lot of the edges with a long, shallow zig-zag to fasten the layers to each other.

When I picked up the machine, the repairman said I wouldn't believe how much fiber he took out of it.  I told him, I would.  Ha!
I need to figure out how to open up the machine so I can periodically dig the fiber out for myself and oil it.  My last machine was so easy to service myself.