Saturday, May 12, 2012

Tiny Handwarmers


These are the tiny hands that were helping me sort through wool for my last blanket.  Olivia's 3 and was wrapping piece after piece around her hands talking about handwarmers.  It's not the right time of year, but she can keep them for fall.


The piece of pink ribbing seemed impossibly small for such a thing, but 3 year old hands are SO tiny, it was perfect.  A little green ribbing for the other end and we were getting there.


I made some tiny flowers and leaves from scraps destined for the scrap ball and stitched them in place.  Sewn into a tube with a thumb slot cut 3/4 inch down the side, they were done.


Here's my phone for size comparison.


They made her a happy girl!

Wednesday, May 9, 2012

Happy Scrappy Blanket


I'm not keeping up with the quantity of blankets I had hoped to make.  I thought I could make a new one each week.  As much as I love making these, the selection process of the colors bogs me down.
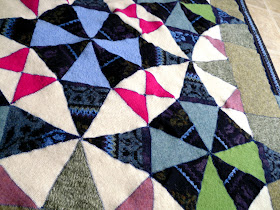
This is the blanket I wanted to make, but before I cut out the star pieces, I really thought it was ugly.
I went ahead and added the solids and it made all the difference.


Looking back on this picture, I almost wish I'd put a black border on it.  It's laid out on a blanket of the same pattern.  Made it really easy to place the pieces.


The Inspector, hard at work.


This is my tried and true thread selection method.  Get a bunch of colors out and start eliminating.  Zigzag uses so much thread that I buy the big spools and have an empty spool that I put inside the cone to use it on a regular spindle.


The main pieces all together and needing a border.


The backside's as pretty as the front.

Tuesday, April 17, 2012

Zippered Pouches

I had a special request for 15 assorted pouches this last month.  No special colors or designs.  I just pulled out a bunch of sweater parts in lots of colors and started cutting.  What a mess that makes and then I start obsessing about every detail.  Some were already made and listed in my shop, I decided they could join the party too.
These don't take long to sew, the selection process is the time killer.  If I was making a dozen at a time, all the same, it would be more time-cost effective.

I/m pretty pleased with the results, some are kinda fancy and others left very plain.  A little something for everyone.  Yes, that's bacon and eggs.

The backsides.  I've used one of my pouches for my camera.  I like how soft it is.  I need to get these in the mail today.

Tuesday, April 3, 2012

Caramels


Whether you say carmel or caramel, they're delicious!  Before Christmas, I got a craving for homemade carmels.  I hadn't made them in years and knew they would be a good addition to all the holiday goodies.
I didn't have a thermometer, so I bought one at the grocery store for $4, how bad could it be?  I made one batch that disappeared real fast.  Right before the holiday, I made time for 2 batches intended for taking to my family gathering.  The first batch went fine and the second seemed to stall at 220 degrees.  I watched it forever before I decided the thermometer must be broken.  Into the trash with that thing!  I saved the carmels, barely.
I went to the kitchen supply store last week and steeled myself to buying a good thermometer, I feared it might be $20-30.  Happy to say, it was $10 on sale 10% off.  I know good tools are important, why hadn't I gone there first.  I've had many a "cheap" thermometer over the years.

Gather all your ingredients-

2C sugar
2C dark corn syrup- the whole pint
1/2 C butter, salted- the whole cube
2C whipping cream- the whole pint
1 tsp vanilla
nuts if you like


Prepare a 9 x 13 pan.  Iv'e always buttered it, but discovered a new use for my Silpat.  Genius!  I just pushed it into the pan and it worked better than anything else I've tried.  I only wanted half of my carmels to have nuts.

Add the sugars and butter together and bring up to a boil over medium heat.  After it's really at a boil, start adding the cream a little at a time.  You have to go slowly and stir a lot to make sure it doesn't boil over.  All that liquid in the cream.

When all the cream is in and your sure it won't boil over, let it continue to boil and watch the temperature.  It'll stay at 220 degrees or so for quite awhile.  When it starts to climb it won't take long.
At 240- 245 degrees, take it off the heat, stir in the vanilla and pour it out into your pan.  Don't dawdle.

The nuts all stayed right where they were,  Not sure if that was the Silpat or not.  The next morning, I put a piece of waxed paper on my cutting board, lifted the Silpat out of the pan and turned it upside down on the paper.  I worried about getting any residual garlic or onion flavors. 
I cut them into pretty small cubes, 1/2- 3/4 inch square, they seem to grow when you chew them.  Use a sharp knife and wrap them in squares of wax paper.  If you don't, they stick right back to each other.  Cut a little, wrap a little.


This is about half of the carmels.  I took a bunch to work.


Wednesday, March 28, 2012

Scrap Balls


I saw scrap balls on someones blog months ago, sorry I can't remember where, and thought it would be fun to try.  The idea is to keep this next to your sewing machine or work area and keep feeding all the tiny pieces you can't save for something else into it instead of the garbage.  You know we crafters will save some pretty small bits to maybe make something else out of them.  You know you do.
Since I like to make stuff (pretty much any stuff), I always have remnants of all types.  I only begrudgingly throw out the tiniest of pieces.
The original pattern was the one on the left.  After I drew the pattern from the directions they gave, I knew it would be far too large a ball for my liking.  I redrafted it in the smaller size and sewed a scrap ball for myself.  The resulting ball took quite a long time to fill.  I left it sitting by the machine and used it when sewing.  It was very easy to get used to putting the scraps into it and fun to watch it slowly fill out.
When it felt stuffed so full that I thought I really couldn't get much more in it and still be able to sew it shut, I did just that.
It's pretty heavy for it's size, like a good orange.  It would be a good baby toy or a dryer ball.
I went along without a new one for a few months before I missed it.  There were a lot of tiny (bitty!) scraps in my basket next to the sewing machine. The crafter in me wanted to stuff a new ball and of course, here it comes, I couldn't leave well enough alone.  Enter the Acorn Scrap Ball.


You see the original lines of the pattern on the right, I made it pointier and cut off the top.  Then I made a circle for the top and gathered it in to fit.  A loop and some decorative stitching and I was ready to stuff.
Before I stuffed it I'd already drawn a new pattern for the next one.  Bigger top and shorter bottom.  Do you see a pattern to my craziness here?  No project can ever be left simple.
After stuffing, I found that it came out so much larger than the original and less acorny than I thought it would.  Maybe the next one will be the smaller top AND the smaller bottom.

I think these would be good to list, unstuffed, in my shop.  The round ones, that is, the acorn cap took a lot longer to sew on than I thought it would.
Crafters could make their own dryer balls and have less angst over scraps in the garbage.

Wednesday, March 21, 2012

Therapy Quilting

Last fall, I was feeling down and short on cash and decided to self medicate with crafting.  It almost always works for whatever ails me.  I had wanted to try wonky stars and threw the wonky log cabins in to mix it up.
I already had the bird fabric from IKEA and left over batting from Rachel's quilt.  The rest of these beauties came form Rachel's scrap bag.  She's made so many beautiful things for her Etsy shop, there was lots to choose from.
Front
Back

There was plenty of information on line to guide me through the star construction.  In September, I went to the Portland Modern Quilt Guild meeting and Ale had a lesson in quilting with perle cotton.  Very timely.  I've done a lot of quilting, but only with regular quilting thread.  This gave me another new thing
to try.


Most of the stars.  Apparently, I can't push the save button when I'm editing the photos.
All 5 stars.  There, it's in there now.


The log cabins, with little birdies peeking out.

The binding was all pieced from the same fabrics.  I accidently made too much and used the extra to make the back more interesting.  It's about 48 inches square.  If I was to do it over, I'd use a solid for the background.  The black and white had too much pattern to give the blocks enough contrast.
I have no use for this quilt, but enjoyed the process and it really did work to lift my spirits.  I spent a total of $3 on it for the perle cotton with my coupon.
My biggest lesson learned, was that I am not a wonky quilter.  This was way out of my comfort zone.  I like having things line up.
What have you done to work through the blues?


Wednesday, March 14, 2012

Kaleidoscope Blanket

I finally finished the next blanket.  I love this pattern, how different it can look depending on the color arrangement.  This is the same pattern as the last blanket, just made to look like individual stars.

I was halfway done when the machine suddenly stopped.  It wouldn't move at all.  Good thing it wasn't in the needle down position.
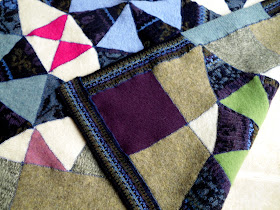
I started with the darkest sweater.  It had lots of pattern and the fancy ribbing looked like it would be perfect for the outer border.  If you look closely you can see the button holes.
This sweater was hard to work with, it had 2 layers and it was hard to catch both edges when sewing it together.  I went back over a lot of the edges with a long, shallow zig-zag to fasten the layers to each other.

When I picked up the machine, the repairman said I wouldn't believe how much fiber he took out of it.  I told him, I would.  Ha!
I need to figure out how to open up the machine so I can periodically dig the fiber out for myself and oil it.  My last machine was so easy to service myself.

Saturday, February 18, 2012

Too long

Recycled wool lap blanket

I haven't posted anything for so long.  Not that I haven't taken pictures and had something to say, we just haven't had internet at home.  I've done everything I've needed to do online at free Wifi locations.  I get done with browsing or paying bills and then think, I'll get back to my blog next time.
Next time has taken forever.  I've made plenty of new blankets and lots of stockings at Christmas.  so many pictures and no posts.  Poo!
We still don't have home internet, I think it's time to end this experiment in frugality and get back online.  I miss it.
I've been trying to make a new blanket each week.  Soon, I'll have so many blankets in my shop, that nobody will be able to search for anything without one of them popping up!  Ha!